
Guide to managing stock transfers between warehouses.
1. Accessing the Stock Transfers Page
- In the left sidebar, find “MOTORSHOP MAIN”.
- Click “Warehousing” (warehouse icon) to expand the menu.
- Click “Stock Transfers” (highlighted in blue when active).
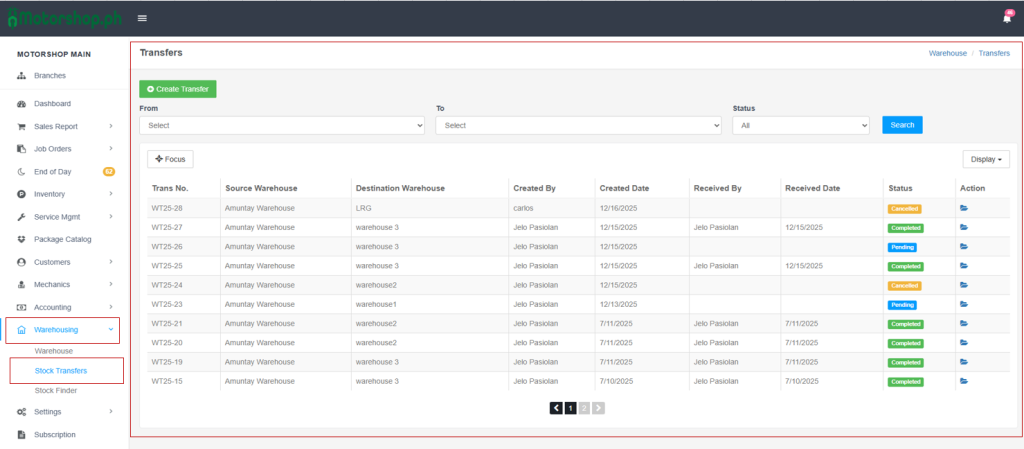
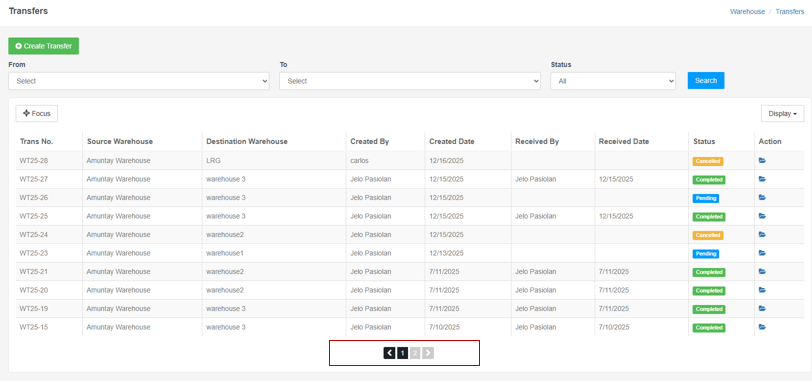
2. Understanding the Stock Transfers Page Layout
The Stock Transfers page includes:
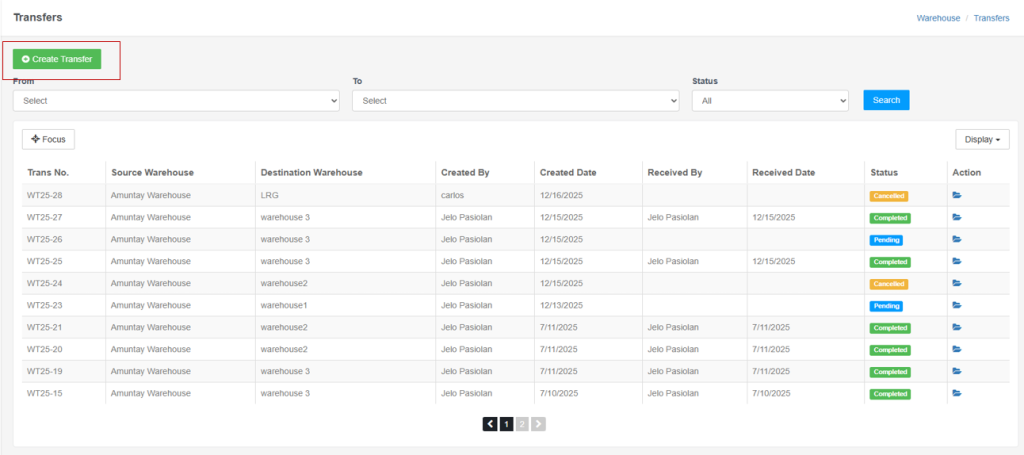
- Action Button (top): Create Transfer
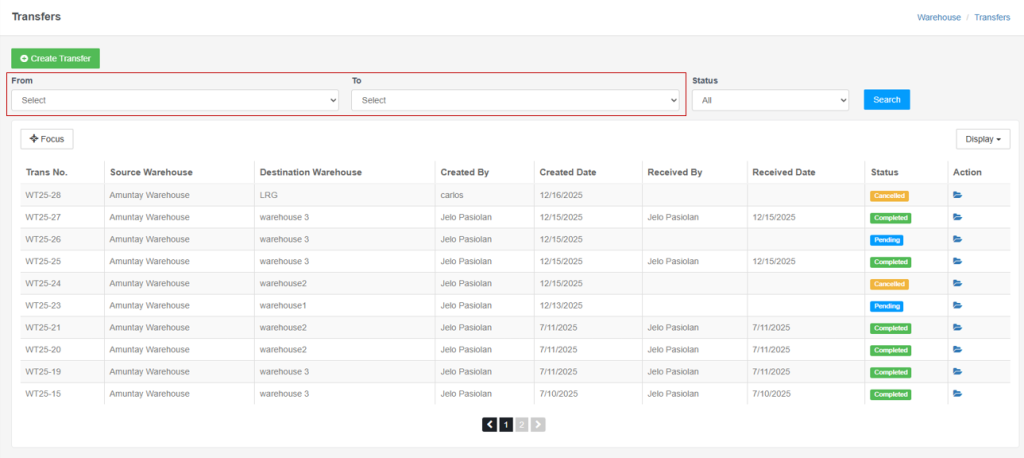
- Filter Section (top): From, To, Status filters
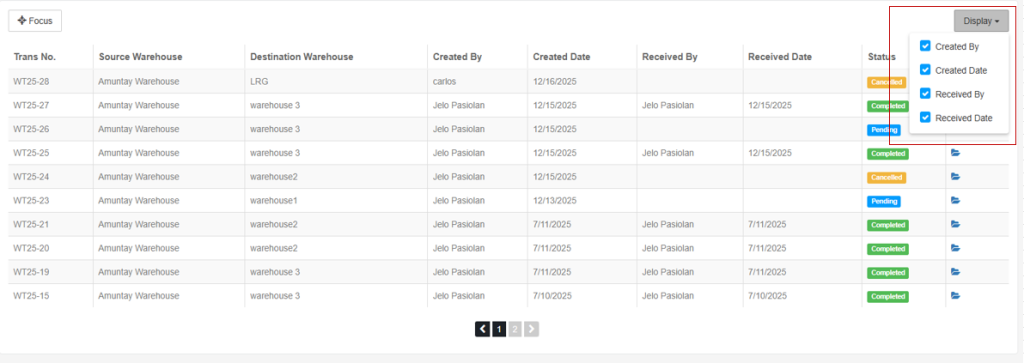
- Display Dropdown (top-right): Customize visible columns
- Transfers Table (main area): List of all transfers
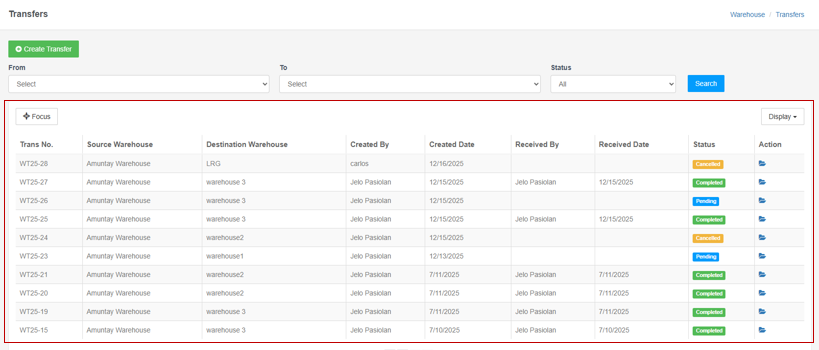
- Pagination (bottom): Navigate through pages
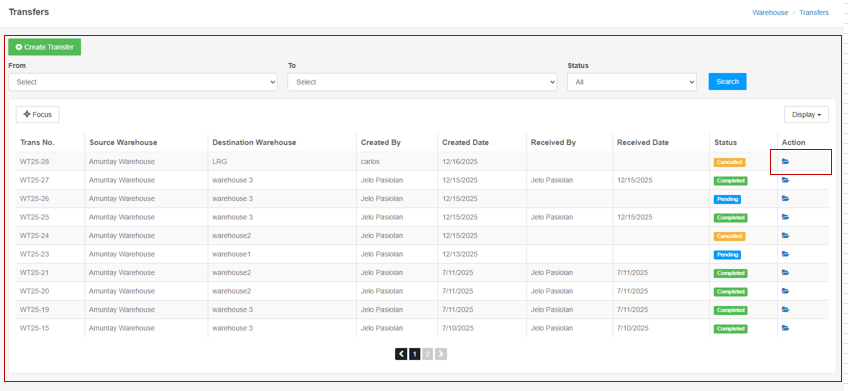
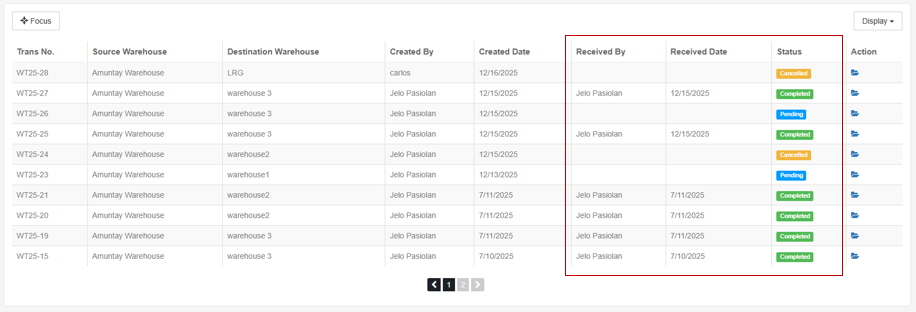
3. Understanding the Transfers Table
Column Descriptions:
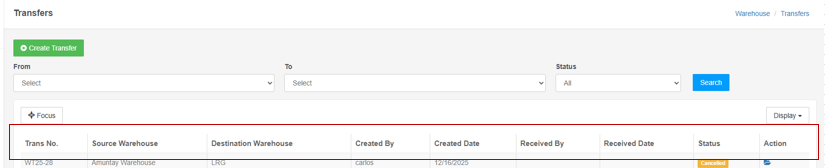
1. Trans No.
- Unique transfer identifier (e.g., WT25-29, WT25-28, WT25-27)
- Format: WT[Year]-[Number]
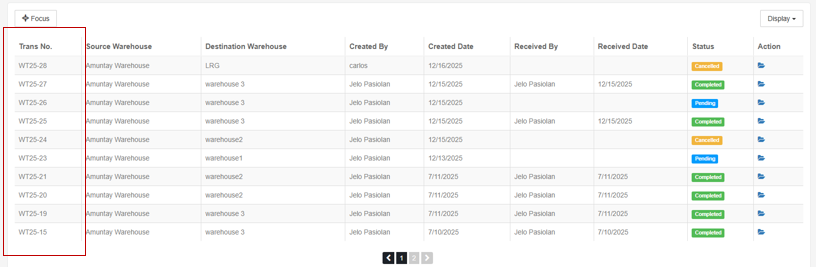
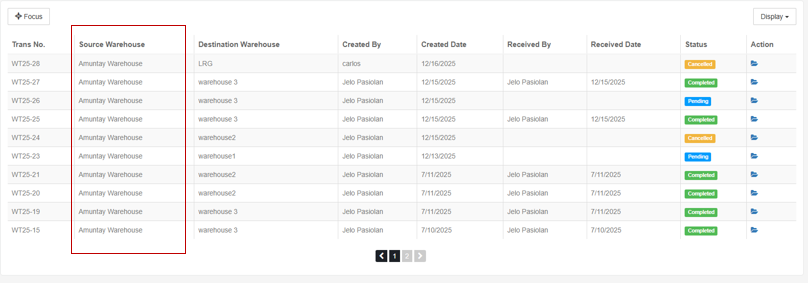
2. Source Warehouse
- Warehouse where products are transferred from
- Example: Amuntay Warehouse
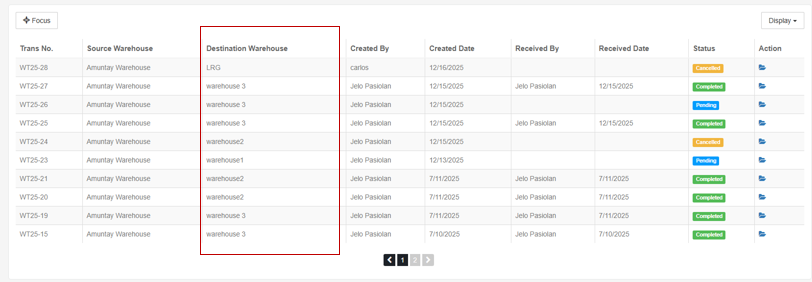
3. Destination Warehouse
- Warehouse where products are transferred to
- Examples: LRG, warehouse 3, warehouse2, warehouse1, House Warehouse
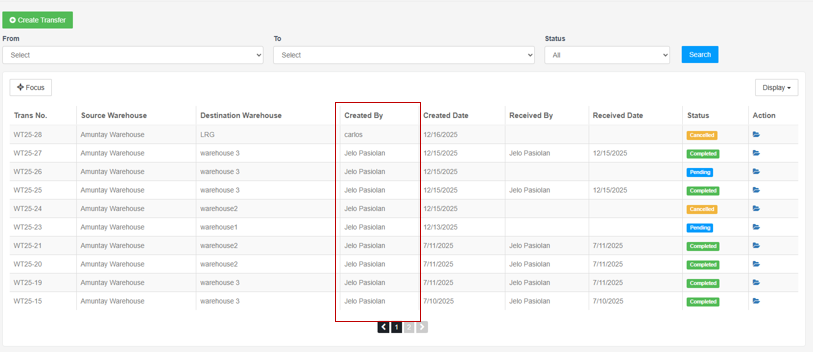
4. Created By
- User who created the transfer
- Example: carlos, Jelo Pasiolan
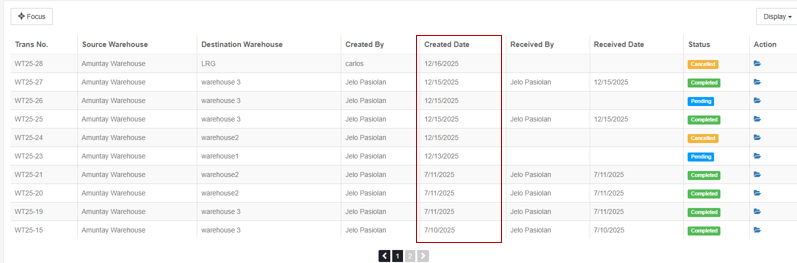
5. Created Date
- Date when the transfer was created
- Format: MM/DD/YYYY (e.g., 12/16/2025)
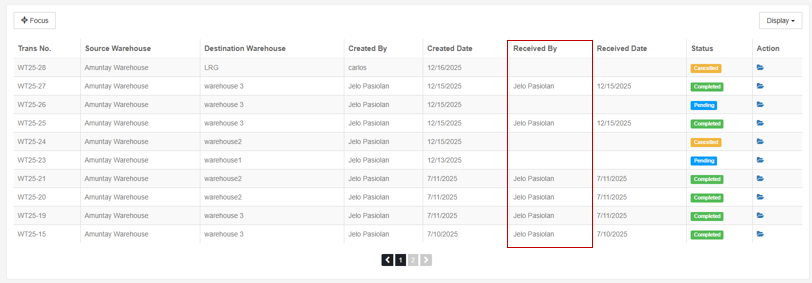
6. Received By
- User who received the transfer (empty if not yet received)
- Example: Jelo Pasiolan, carlos
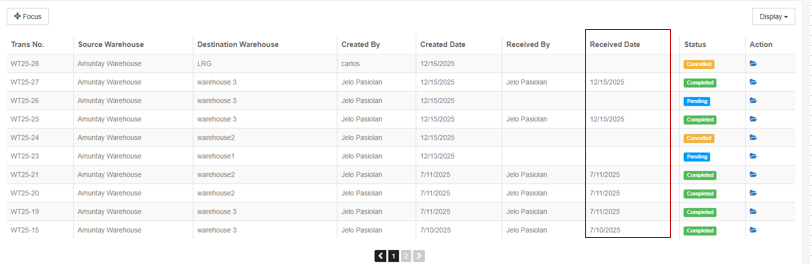
7. Received Date
- Date when the transfer was received (empty if not yet received)
- Format: MM/DD/YYYY (e.g., 12/16/2025)
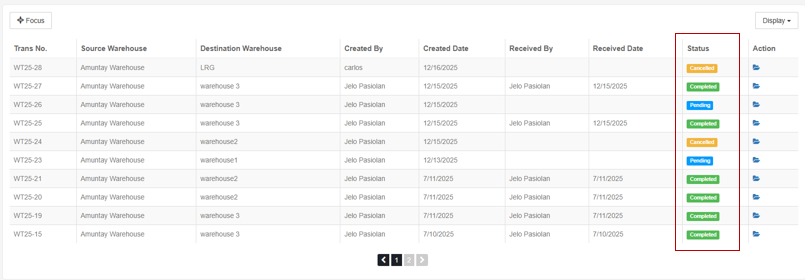
8. Status
- Current state of the transfer:
- Pending (light blue badge): Created but not yet received
- Completed (green badge): Received and completed
- Cancelled (yellow/orange badge): Transfer was cancelled
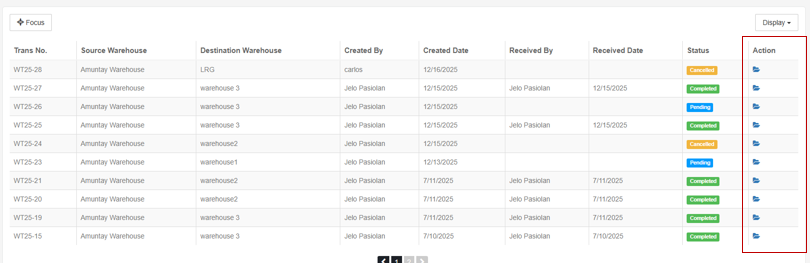
9. Action
- Folder icon (blue): View transfer details/slip
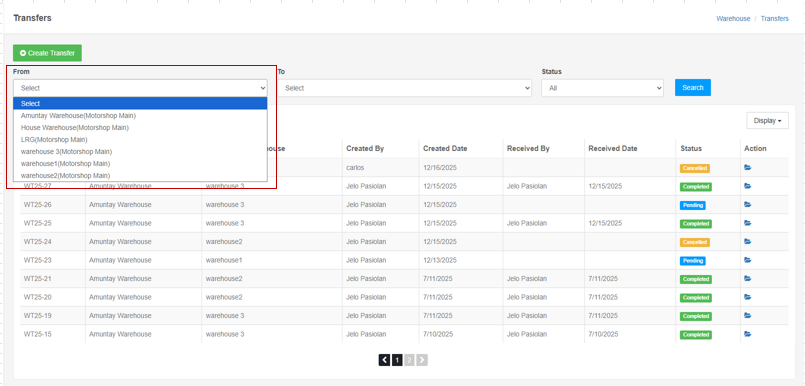
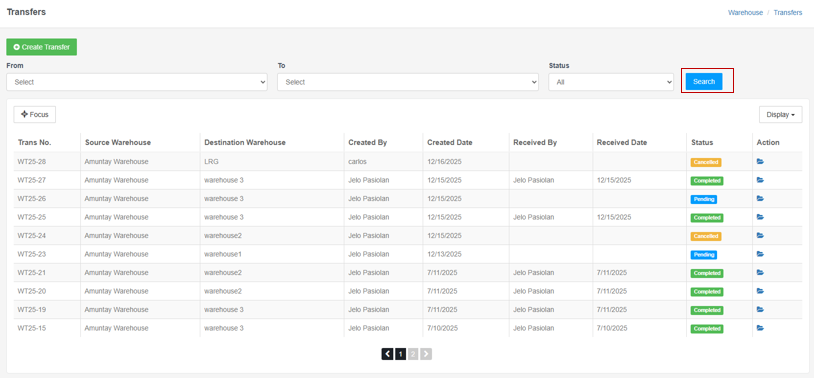
4. Using the Filters
From Filter
- Click the “From” dropdown
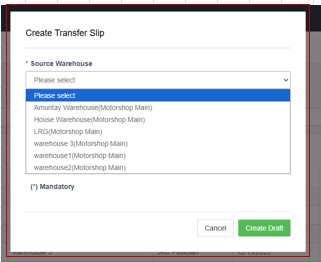
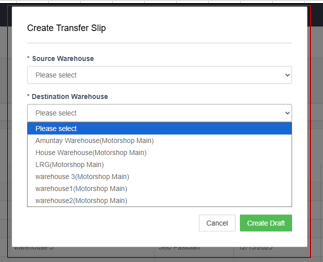
- Select the source warehouse:
- Amuntay Warehouse (Motorshop Main)
- House Warehouse (Motorshop Main)
- LRG (Motorshop Main)
- warehouse 3 (Motorshop Main)
- warehouse1 (Motorshop Main)
- warehouse2 (Motorshop Main)
- Or leave as “Select” to show all
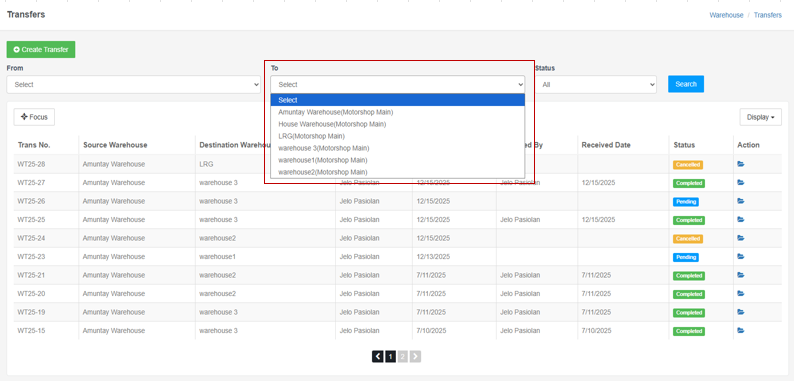
To Filter
- Click the “To” dropdown
- Select the destination warehouse (same options as From)
- Or leave as “Select” to show all
Status Filter
- Click the “Status” dropdown
- Options:
- All (default): Shows all transfers
- PENDING: Shows only pending transfers
- COMPLETED: Shows only completed transfers
- CANCELLED: Shows only cancelled transfers

Applying Filters
- After setting filters, click the blue “Search” button to refresh results
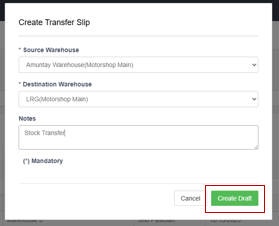
5. Creating a New Stock Transfer
Step 1: Open Create Transfer Modal
- Click the green “+ Create Transfer” button
- The “Create Transfer Slip” modal opens
Step 2: Fill Transfer Information
1. Source Warehouse (required):
- Click the dropdown
- Select the source warehouse (e.g., Amuntay Warehouse)
- Marked with asterisk ()
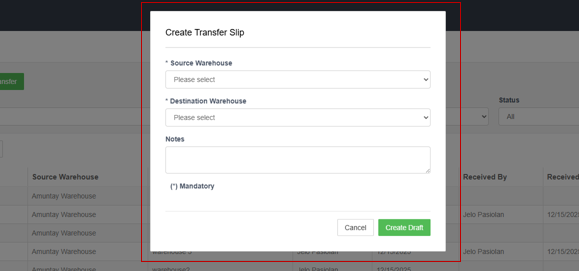
2. Destination Warehouse (required):
- Click the dropdown
- Select the destination warehouse (e.g., LRG)
- Marked with asterisk ()
- Must be different from Source Warehouse
3. Notes (optional):
- Enter any notes about the transfer
- Example: “Stock Transfer”, “Restocking warehouse”, etc.
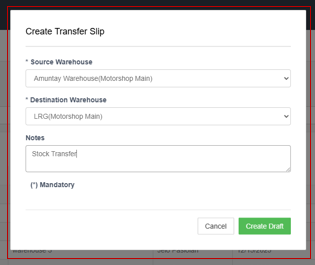
Step 3: Create Draft
Click “Create Draft” (green button)
The transfer slip is created with status “Pending”
You’ll be redirected to the transfer details page
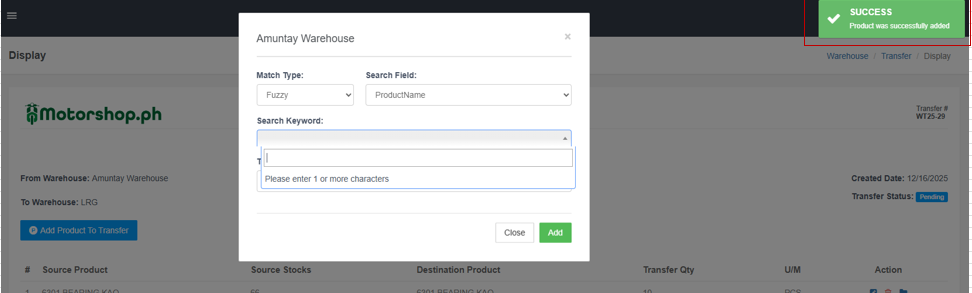
6. Adding Products to a Transfer
Step 1: Open Add Product Modal
1. On the transfer details page, click the blue “Add Product To Transfer” button
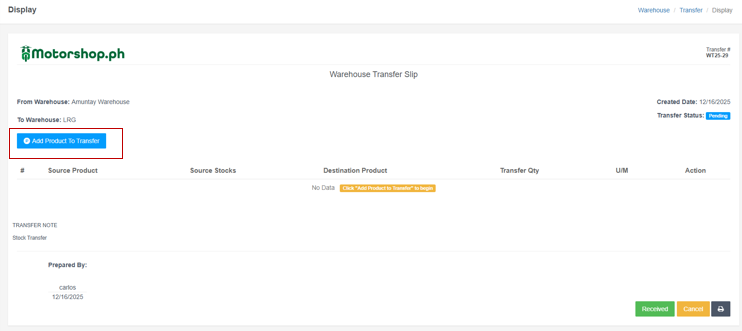
2. A modal opens showing the source warehouse name (e.g., “Amuntay Warehouse”)
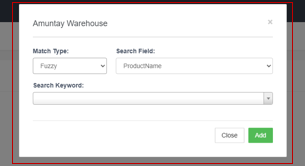
Step 2: Search for Products
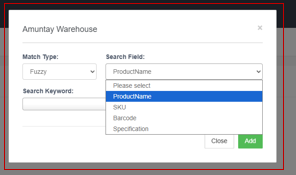
1. Match Type: Select search algorithm
- Fuzzy: Flexible matching (default)
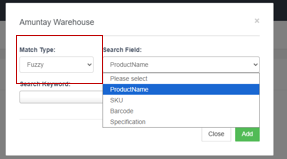
2. Search Field: Select what to search
- ProductName: Search by product name (default)
- SKU: Search by SKU
- Barcode: Search by barcode
- Specification: Search in product specifications
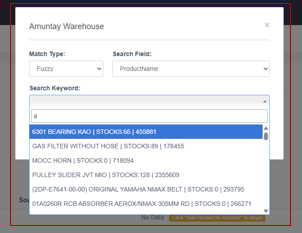
3. Search Keyword: Type at least 1 character
- Product list filters as you type
- Format: “PRODUCT NAME | STOCKS:XX | SKU_NUMBER”
- Example: “6301 BEARING KAO | STOCKS:66 | 455881”
Step 3: Select Product and Quantity
- Click a product from the filtered list
- Enter Transfer Qty (quantity to transfer)
- Use up/down arrows or type directly
- Cannot exceed Source Stocks
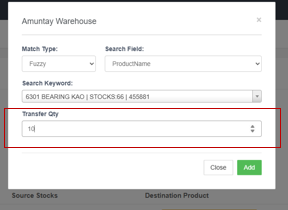
Click Add to Successfully add Stocks to the Transfer Slip
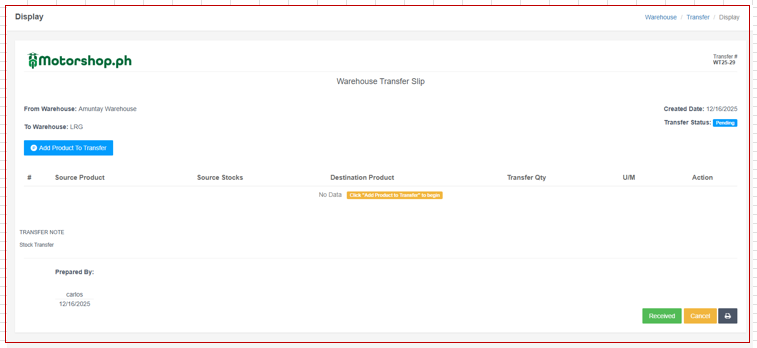
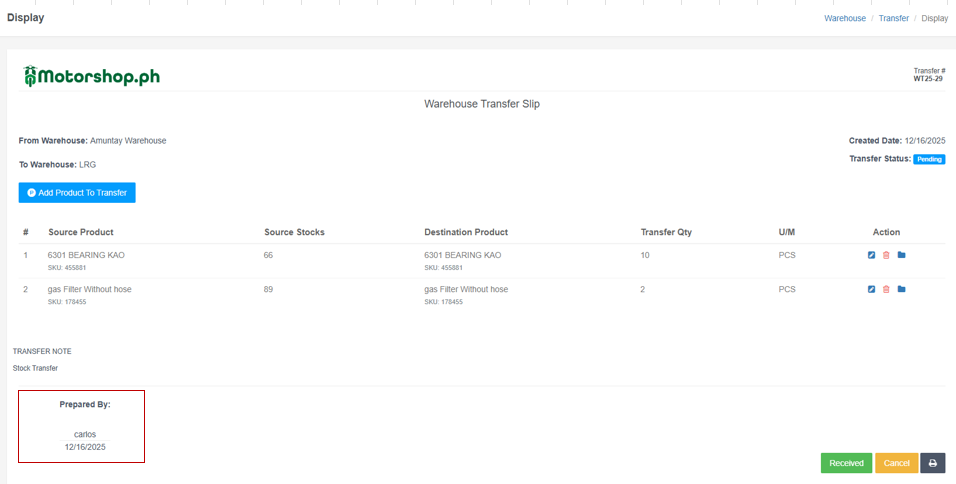
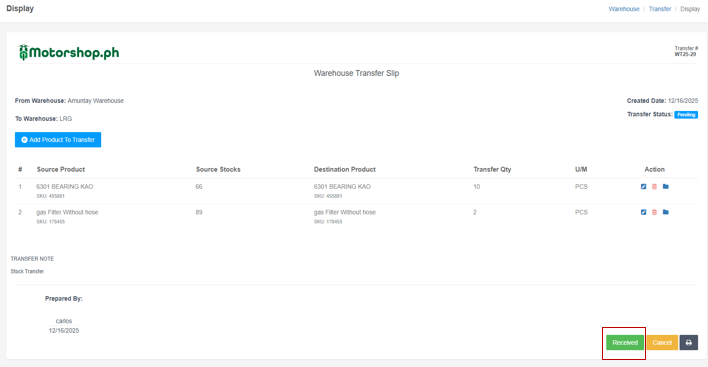
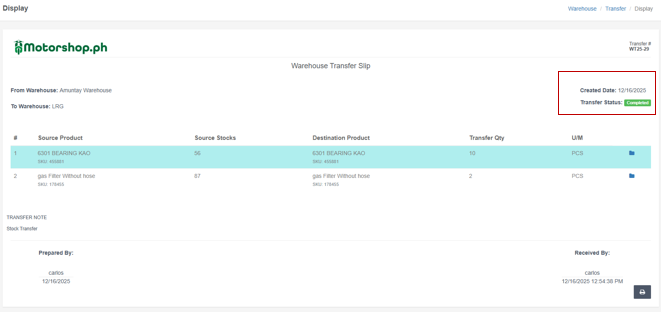
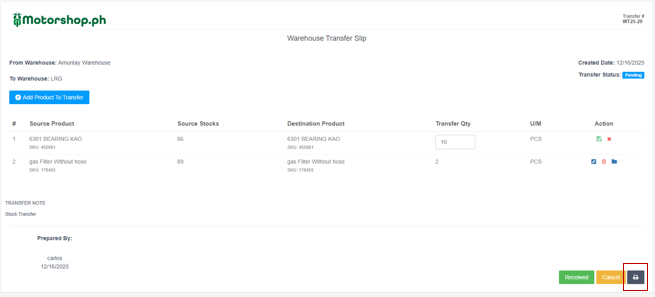
7. Understanding the Transfer Slip (Details Page)
When viewing a transfer (click the folder icon), you’ll see:
Header Information:
- Transfer #: Unique identifier (e.g., WT25-29)
- Created Date: When transfer was created
- Transfer Status: Pending, Completed, or Cancelled
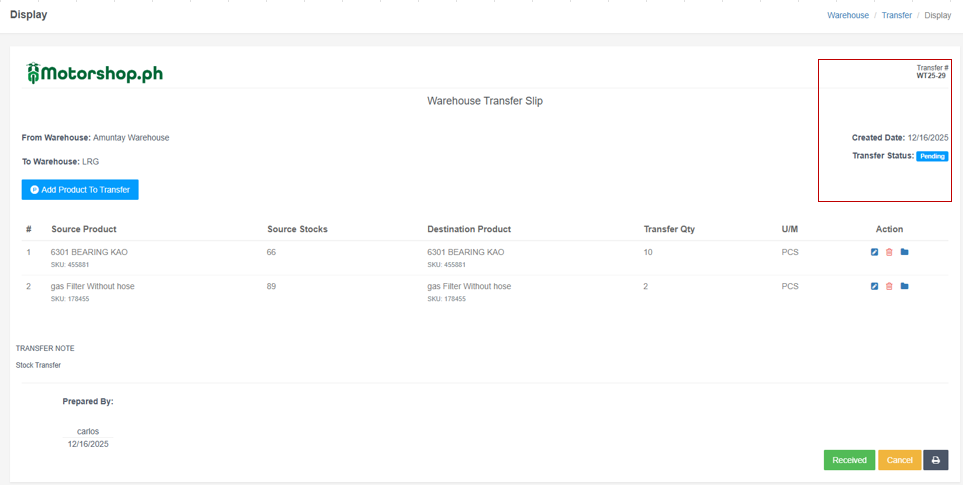
Warehouse Information:
- From Warehouse: Source warehouse name
- To Warehouse: Destination warehouse name

Product Transfer Table:
Columns:
- #: Item number
- Source Product: Product name and SKU from source warehouse
- Source Stocks: Available quantity in source warehouse
- Destination Product: Product name and SKU (usually same as source)
- Transfer Qty: Quantity being transferred (editable)
- U/M: Unit of Measure (e.g., PCS)
- Action: Icons for edit, delete, view
Transfer Note:
- Notes entered when creating the transfer
- Can be edited if transfer is still Pending
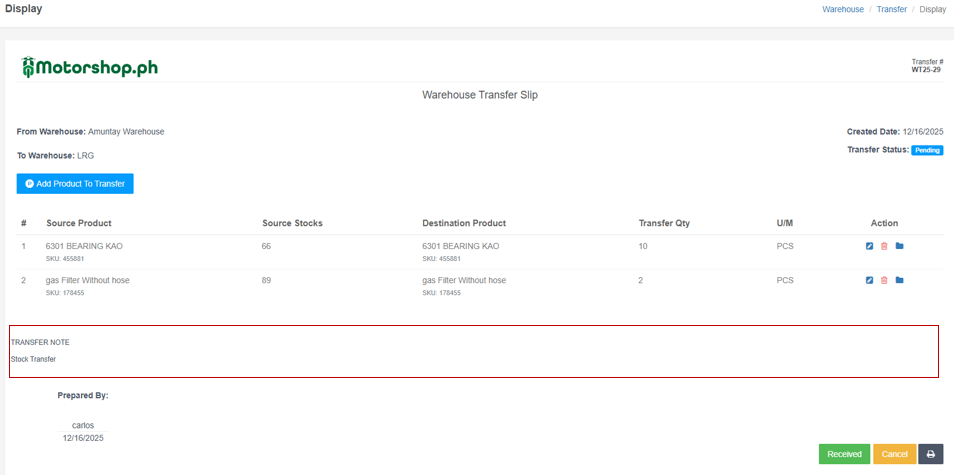
Prepared By:
- Name of user who created the transfer
- Date when transfer was created
Received By (if completed):
- Name of user who received the transfer
- Date and time when transfer was received
8. Managing Transfer Products
Edit Transfer Quantity
- Click the pencil icon (blue) in the Action column
- Modify the Transfer Qty value
- Click save icon (green floppy disk) to save
- Click cancel icon (red X) to cancel
Delete Product from Transfer
- Click the trash icon (red) in the Action column
- Confirm deletion
- Product is removed from the transfer

View Product Details
- Click the folder icon (blue) in the Action column
- Opens product details page
9. Completing a Transfer
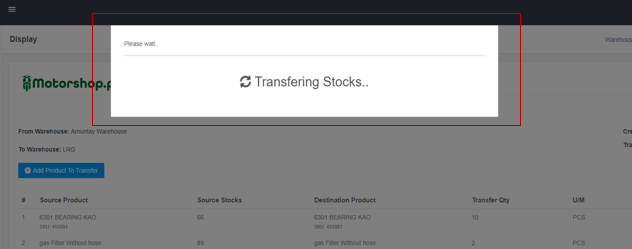
Mark Transfer as Received
- On the transfer details page, click the green “Received” button
- System processes the transfer:
- Shows “Transferring Stocks..” message
- Updates stock levels in both warehouses
- Changes status to “Completed”
- Records “Received By” and “Received Date”
Cancel a Transfer
- On the transfer details page, click the orange “Cancel” button
- Confirm cancellation
- Transfer status changes to “Cancelled”
- Stock levels remain unchanged

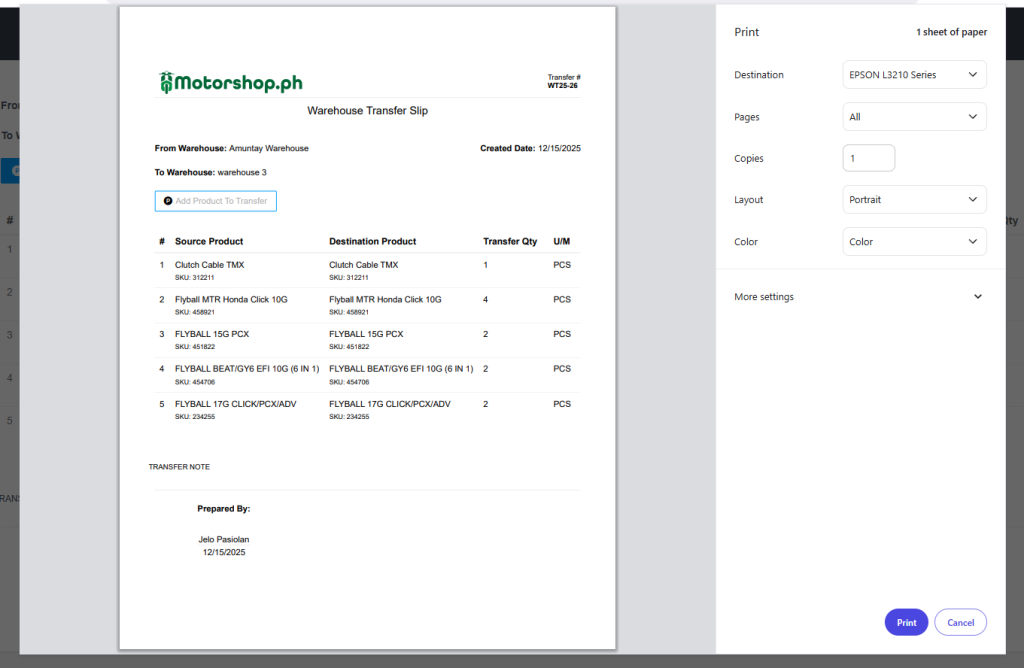
10. Printing Transfer Slips
- On the transfer details page, click the printer icon (dark grey button)
- Print dialog opens
- Select printer, number of copies, layout (Portrait/Landscape)
- Click “Print” to print the transfer slip
Video Tutorial
Tips for Effective Transfer Management
- Verify Stock Availability: Check Source Stocks before adding products
- Use Notes: Add notes for context (e.g., “Restocking”, “Customer order”)
- Review Before Receiving: Verify all products and quantities before marking as received
- Print for Records: Print completed transfers for physical documentation
- Filter Regularly: Use filters to find specific transfers quickly
- Monitor Pending: Regularly check pending transfers to ensure timely completion
- Check Dates: Review Created Date and Received Date to track transfer timelines
Troubleshooting
- Can’t create transfer?
- Ensure Source and Destination warehouses are different
- Verify both warehouses are selected (required fields)
- Can’t add products?
- Check if Source Stocks > 0
- Ensure transfer status is “Pending” (can’t modify Completed/Cancelled)
- Transfer not showing?
- Check filter settings (From, To, Status)
- Try setting all filters to “All” or “Select”
- Check pagination (may be on another page)
- Can’t mark as received?
- Verify transfer status is “Pending”
- Ensure you have proper permissions
- Check if all products have valid quantities